Tag Archives: beer

Day 322, Ingredient No. 37-Sundried Tomatoes

Upon discovering something that pleases us, we often repeat that new aspect of life continuously due to it being so new, pleasurable, and exciting. It is why, upon hearing a song I really like for the first time, I will replay that song to death. It is why I watched 10 straight hours of TV after purchasing my first HDTV. It is why, other than sleeping and eating, I didn’t get a single thing done the week I discovered that it felt good, really good, when I started messing with my below-the-belt-bits.

And, perhaps it why dried foods were discovered.

Now, although I love researching the history of everything from civilizations to sporks, I am by no means a reputable source of historical information. But I will now submit my hypothesis on the discovery of dried foods. A hypothesis that, I can assure you, involved no research whatsoever due to the fact I am researching this 6-pack of beer as I write this.

I believe that perhaps, just perhaps, the discovery of dried foods was made right after the discovery of beer.

Again, when we find something new that greatly pleases us, as I’m sure beer did, you want to engulf your life with it. You want it constantly. You want it in great volumes. You want to figure out why it makes the earth spin and makes you get sick when you drink it in great volumes,  at least in the case of beer anyway (case of beer…get it?). So I am guessing that on that day, thousands of years ago, when man discovered that the porridge he had left in the rain had turned into a drink that could make his brain tickle, he decided that he needed more.

Once he was able to surmise how the deliciously intoxicating beverage came to be, he probably shared it with others of his village, leading to the world’s first “kegger.” Following suit, these secondary discoverers obviously wanted more, after all, it was new, exciting, intoxicating, and they wanted more and they wanted it now. In their haste to acquire and consume more of the beverage, they perhaps forgot to attend to their fields. Or perhaps they discovered hangovers.

When the beer finally ran out, they stumbled out to discover that their fruits had become dried and shriveled under the hot sun and wind and now resembled smaller versions of things they found under their loincloths. Thus, dried food was discovered.

Okay, so it’s a load of crap and ridiculously historically inaccurate given that agriculture and dried foods came millennia before beer, so it’s useless as a hypothesis but entertaining nonetheless.

And on the theme of dried foods, today’s ingredient is sundried tomatoes.

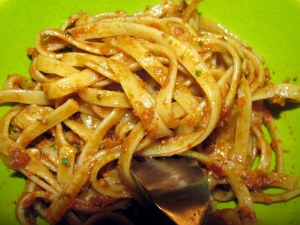
There isn’t much novelty in a sundried tomato pesto, but this one is better than most, I assure you. It’s light enough to accompany a plate of pasta without overpowering it, yet it has the rich, slightly sweet and strong taste we associate with sundried tomatoes.

It’s also really good with beer.

IMG_1002

Yes, it’s a terrible picture, but I can blame it on the beer.

Sundried Tomato and Walnut Pesto

-12 oz sundried tomatoes

-1/3 cup walnuts

-1/4 cup Romano cheese

-2 tbsp basil, julienned

-1/4 cup flat-leaf parsley, chopped fine

-approximately 1/3 cup olive oil

Add all the ingredients, except the oil, to a food processor and blitz until the sundried tomatoes and walnuts are chopped. Slowly drizzle in the oil while running the processor until a slightly viscous sauce is formed. Season with salt and pepper.

Tagged , , , , , , , , , , , , ,

Day 179, Ingredient No. 63-Beer

Most scholars believe that the discovery of alcohol was purely accidental. Many believe that a bowl of grain was sat out in the rain, and when the sun shone again, it slowly raised the temperature of the water, converting the grain’s starches into sugars, thus making a wort. Add some wild yeast to consume these sugars and give off ethanol and carbon dioxide, and you have the greatest discovery man has ever known, beer.

What can I say about the world’s finest beverage? And yes, that’s a subjective statement and no I do not care…I’m right. Well, I can say that in order to remind myself how wonderful beer is, I drink at least one or two a day, or eight just to make sure I’m fully reminding myself. I love the fact that beer can be so very, very many things. Brown ales, stouts, porters, IPAs, fruit beer, smoked beers, ales, lagers, adjunct lagers, pale ales, the list seems endless. And of course, to each of these styles there are many deviations as well as the fact that you can add an array of ingredients to an already established style. It’s good served cold, it’s better served room temperature (yes, good beer is anyway). But perhaps my favorite part about beer is the fact that I get more of it. Because it is generally lower in ABV than wine or liquor, I get more!

It is because of my intense love for this fermented beverage that for the longest time I refused to cook with beer. Why would I seemingly waste a perfectly good beer by pouring it into a dish? Why not just drink it while I make the dish, and if I drink enough of them while making the dish, no matter what it is, it’s going to taste good. I have now gotten over this phobia of incorporating beer in my cooking, but I still do it very rarely. When I do cook with beer, there is about a 99 percent chance that it is going to be Guinness, and there is a very good chance it will be used in a beef dish. Today was no exception.

So, there is nothing creative about this recipe. It’s not innovative, exciting, or intriguing. I’m sure there is a recipe that is almost exactly like this one out there…and probably more than just one. But I’m not concerned. Although I did enjoy this dish, the fact is, for me, beer is for drinking and that’s how I intend to use it. Now even though I have spent much time today extolling my love of beer, I think I still need to remind myself why I love it so much, over and over again.

DSCF7576

Guinness Braised Beef

-2 lb top blade cut

-1 14.9 can Guinness Draught

-2 ribs celery, rough-chopped

-2 carrots, rough chopped

-1 yellow onion, rough chopped

-5 cloves garlic, crushed

-2 tbsp molasses

-1 tbsp Worcestershire sauce

-1 tbsp dried parsley

Season the beef heavily with salt and pepper and sear until browned on both sides. Add the vegetables, molasses, parsley, and Worcestershire over the beef, cover with plastic wrap, then aluminum foil, and bake at 300 F for approximately 1 ½ to 2 hours or until fork tender.

Tagged , , , , , , , , , , , , ,

Day 28, Ingredient No. 23-Eggs

When one wakes up to find they are stricken with a hangover, they generally want and need to consume certain things to stave off the feeling that they over imbibed the previous night. A lot of water, perhaps some caffeine, acetaminophen or ibuprofen, rest, and a hearty meal are sure fire ways to at least somewhat alleviate the dreaded feelings of a hangover. Of course, the latter is best when you don’t have to cook it yourself, considering the state you have found yourself in where even moving out of the bed is enough to make your gut ache and your head swirl. However, if you find that you must prepare yourself something to eat (generally just to have something in your stomach for the ibuprofen intake) it is best that the aforementioned dish be something quick and not labor intensive in any sense at all. Basically, not Eggs fucking Benedict.

But as I awoke this morning, feeling as if my head were a lump of iron, I knew that I had promised my girlfriend that I would cook what is perhaps her favorite dish for breakfast. You guessed it, Eggs fucking Benedict. On any other day I would have stated that I was in no condition to move immediately from bed to kitchen and begin a labor intensive dish, but having promised her I would make it the previous night when I drew number 23, eggs, and hearing her talk all night of how excited she was for me to prepare it, I knew I had to. So off I stumbled into the kitchen, downed a piece of bread, chugged a bottle of water, popped a few ibuprofen, and got to cooking.

Eggs Benedict is one of those dishes in which the history and creation are not crystal clear. But then again, most people don’t care about that. All they know is it has pork, bread, poached egg, and glorious, absolutely glorious hollandaise.

Hollandaise is a mother sauce, and of the mother sauces, it is by far the most finicky, i.e. easily broken. Over-heat the eggs and they scramble. Add the butter too quickly and it breaks. Add too much butter and it becomes egg and butter soup. Yet, as with all things in the kitchen, a little practice goes a long way, and once you make a hollandaise it becomes, as the cliché goes, “like riding a bike.”

Begin by whisking the egg yolks

Begin by whisking the egg yolks

Drizzle the butter in slowly

Drizzle the butter in slowly

And done

And done


There are a few different methods for cooking hollandaise. There is the stove top method, in which the eggs are beaten in a saucier on direct heat and then moved off and back on to the heat source in intervals. Most people forego this method because your timing of bringing the eggs off the heat and then returning them to the heat is absolutely crucial or you will scramble the eggs. And scrambled eggs are great, but I imagine they lend to a rather unsavory “sauce.”

Another method is to use a food processor or immersion blender to do the whisking for you. In this method, you add all your ingredients minus the butter, give them a mix, and then slowly drizzle in the warm butter. This method is by far the easiest, however, if you have a food processor, blender, or immersion blender that is anything but top notch, you can very easily find yourself with a broken sauce. Believe me, I know from experience.

Perhaps the most popular method for preparing hollandaise is the double-boiler method. In this method, a bowl is placed over a pot of boiling water (not touching the water!) and the sauce is prepared inside the bowl. This method allows for the proper cooking of the egg yolk while the heat remains relatively low to prevent over-heating. Though I have used all three methods to successfully create a hollandaise, the double-boiler method is my preference.

As mentioned earlier, there is no concrete evidence as to how Eggs Benedict came to be, but one creation story involves my very state this morning; hungover. The story involves one Lemuel Benedict, a former stock broker who found himself with quite a case of the “heads” at the Waldorf Hotel in 1894, where he requested, “buttered toast, poached eggs, crisp bacon, and a hooker of hollandaise.” There is much dispute as to whether Eggs Benedict came to be thanks to Mr. L. Benedict himself, however, I’d like to think in his fog of a hangover, he knew that this dish would ease the aching of his head, because it certainly did so for me this morning.

Or perhaps it was the half-gallon of water I chugged, 4 ibuprofen, full Red Bull consumed, and hot shower, but who knows. What I do know is that no matter who created this dish, I am forever thankful.

(Note-No I did not use clarified butter. Usually I would have clarified some the night before, but I was too busy drinking. And yes I could have done it this morning, but damn it, I was hungover, cut me some slack. Also, as you will see I used pork belly bacon in lieu of Canadian, or back bacon. I enjoy both but I already had bacon on hand and I enjoy the crunch.)

IMG_0534

Yeah, so I messed one up. But with how hungover I was, it’s amazing I could even boil water.

Hollandaise

-3 egg yolks

-4 oz butter (approximate)

-1 tbsp lemon juice

-1 tsp cayenne pepper

Whisk the egg yolks over a double boiler, on and off the heat in increments of about 15 seconds. Whisk until the yolks are thickened. Melt the butter. Drizzle the butter into the eggs very slowly while whisking constantly. Continue until all the butter has been incorporated or the sauce is very thick. Whisk in the lemon juice and cayenne. Season with salt and pepper.

IMG_0536

Eggs Benedict

-2 English muffins

-6 pieces extra thick bacon

-4 eggs

-3 scallions, sliced thin

Cook the bacon until very crispy. Poach the eggs and season with salt and pepper once out of the water. Butter the English muffins and toast. Top the muffins with bacon, the poached eggs, hollandaise, and scallions.

IMG_0539

Tagged , , , , , , , , , , , , , , , , , , , ,

Day 13, Ingredient No. 13-Red Cabbage

I need to start cooking more. It’s not that I am not cooking whatsoever, but it has been two weeks since I started this culinary endeavor and this will only be the eighth meal I’ve created. The problem I have encountered is cooking outside of the lottery. I’ll get a craving for something, say a hamburger last night, and I will cook that in lieu of pulling a number. Now common sense would say just incorporate whatever you draw into what you crave, but I wanted a burger and although it may be “in” to put unconventional ingredients on to a burger like blueberries or asparagus, I am not going to stoop to that. Call me a traditionalist if you like. Anyway, I have vowed that as long as circumstances allow it, I shall cook with what I draw from now on. Of course, that was the original plan, now I just have to stick to it.

Today I drew No. 90, red cabbage. Many people I know are not cabbage fans, and by not fans of cabbage I mean they pretty much despise it. Me, I love it. It’s another one of those ingredients I don’t eat often but am always glad when I do. But no matter my feelings for it, there are those that despise it. So I thought I’d get a little creative. Actually, that was bullshit. I had no real intention of doing something creative but something very unconventional (not burger related) did pop into my head. Cabbage…German food…Pretzels!

My idea was to incorporate red cabbage into soft pretzels. Okay, I already know you think it sounds almost as disgusting as imagining your grandmother doing porn, but I assure you they are not bad, in fact they were pretty damn good if I say so myself.

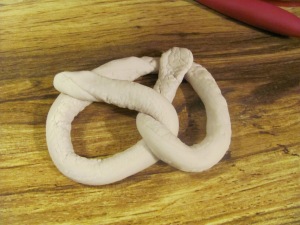
To Form A pretzel-First, form a "Jesus" bumper sticker fish

To Form A pretzel-First, form a “Jesus” bumper sticker fish

IMG_0459

Take the side that is under (in this case the left side) and stretch it over to connect to the opposite side (the right in this case)

IMG_0460

Take the side that started on top and place it on the opposite side (right to left in this case)

IMG_0461

Flip the pretzel over

  Simply stated, I am jinxed when it comes to dough. Although for the past 5 years I have worked with dough in one form or another every single day I have worked, yet, I still somehow remain jinxed when it comes to making dough at home. Being a Georgia boy I have tried countless different recipes, many of them multiple times, for southern biscuits and have failed to even manufacture a decent dough. That’s why I wasn’t going to try and formulate a pretzel dough from scratch, but rather cheat in my opinion, and use a recipe I had come across a few years earlier.

My idea was to braise some cabbage and use the braising liquid instead of the water called for in the recipe. I was unsure how much true cabbage flavor this would impart in the dough, but hey, why not give it a shot?

After letting the braising liquid cool to just warm, I added it to the dough. Something I hadn’t given much thought to occurred, the dough turned slightly purple. Well, purple pretzels (good band name?) are still fine in my book, as long as they taste good, which I would of course have to wait to find out.

Though in the end, I would not have purple pretzels, I would have green pretzels. Turns out my alkaline solution to boil the pretzels in the pre-baking phase was a little heavy on the baking soda. This turned the pretzels a sickly green color. Maybe purple pretzels were never meant to be after all.

I thought I’d stick with the Bavarian theme the night seemed to be taking and get some bratwurst to pair with the pretzels. Cooking brats in beer is pretty cliché, but good nonetheless, so I decided to utilize that method of cooking the brats. However, I had quite a special beer to cook them in…a chile ale. I’ve homebrewed my own beer for a few years now and it is, like cooking, a wonderful creative outlet. And it’s beer! About a year ago I brewed a standard ale with smoked Serrano, Habanero, and Jalapeno peppers. Although I absolutely adore spicy foods,  the beer turned out so spicy it was hardly palatable. I’ve kept it though for cooking, which it is far better suited for.

Once the pretzels were done, I tasted them. Not cabbage-y at all. The braising liquid did not impart any real cabbage flavor into the pretzels. Shit. I knew I needed cabbage to show up somehow so I took the braised cabbage and decided to make something far less appealing sounding to most people than cabbage pretzels; cabbage mustard.

As strange as that sounds, the cabbage mustard was absolutely one of the best “cooked on a whim” items I’ve made in a very long time. Paired with the brats, it was one of the best meals I had consumed in a very long time. Cabbage-y and delicious.

All being said, one of the points of this experiment was to do just that, experiment. This meal was definitely unconventional and something prior to drawing red cabbage something I had never even remotely considered. All in all, I was very happy with the final product.

(Since the recipe for the pretzels I used was not original I will not be posting the recipe, and since you would have to brew a batch of beer solely for the purpose of the brats, I won’t be adding that one either. The one recipe I will post is the cabbage mustard. So be unconventional and make it. Hell, put it on a burger if you’d like.)

Cabbage Mustard

-2 cups red cabbage, braised in water with lemon juice and about 8 cloves, drained

-1/2 cup spicy brown mustard

-1/4 cup heavy cream

-2 tbsp yellow mustard

-1 tbsp ground mustard

Combine all ingredients in a food processor or use an immersion blender to combine until smooth. Season with salt and pepper.

Tagged , , , , , , , , , , , , , , , , ,

Day 6, Ingredient No. 96-Chorizo

I have been sent to the hospital, hand wrapped and bleeding profusely. I have cut off large chunks of three fingers. I have been sent to a clinic for having undiluted professional grade cleaning solution shot directly into my open eye. I have been elbowed in the face, kicked in the shins, and punched in my sides. I have had more burns and cuts, some severe, than I could even attempt to recall. In my years of working in restaurants, I’ve encountered a good bit of pain. But none of those experiences can even begin to compare with what is by far the worst pain I have ever felt due to working with food; peeing after slicing jalapenos.

Capsaicin is the chemical in chilis like jalapenos that give them their distinctive “heat.” And when it comes in contact with your hands and subsequently your very sensitive bits, it provides a “heat” that is one of the most unbearable pains you can ever hope to never feel.

On my 18th birthday, I made what was then, and is still now, one of my favorite snacks-jalapenos cut in half with seeds and all, filled with cream cheese, and seasoned with salt, pepper, and smoked paprika. On this particular day of making this snack, I would experience the true power of capsaicin.

After preparing what are essentially un-fried (and in my opinion much better) jalapeno poppers, I went to the bathroom to drain my bladder. After flushing the toilet I felt a burning sensation on my most sensitive of extremities. About 20 seconds later I was in a full panic as the burning not only continued but worsened. At the time I had no idea what the problem was, other than the fact that I felt like I had stuck my penis into a camp-fire. In my panic, I quickly took all my clothes off and jumped into the shower, the warm water only making the burning that much worse. Mind you, this not only was a horrible burning, but it was horrible burning on a part of me that, as a man, is perhaps my most important body part. I know many men, myself included, that would probably give up legs and arms instead of their “manhood.” Eventually though, the burning did cease, and all was eventually fine. However, I still cannot cut jalapenos without the nagging fear that will happen again, so much so that I keep a box of latex gloves in my kitchen solely for the use of cutting chilis.

I utilized those gloves tonight while slicing ultra-thin jalapeno slices to garnish what I believe to be one of my best dishes in recent memory, using one of my favorite ingredients-chorizo.

The recipe below calls for removing the chorizo after it is done cooking. Well, when I made it I did not remove it. Therefore when it came time to add the immersion blender to the sauce, I was essentially re-grinding the chorizo into submission. Oops.

Chorizo Beer Cheese Soup

-1 lb chorizo sausage

-2 1/2 oz celery, diced

-2 1/2 oz carrot, diced

-4 oz red onion, diced

-2 oz red bell pepper, diced

-5 oz Oaxaca cheese

-3 oz sharp Cheddar cheese

-2 oz Cooper’s cheese

-1 14.9 oz can Guinness Draught

-3 cups Chicken stock

-1 pt heavy cream

-2 tbs chives, sliced fine

-1 tsp smoked paprika

-1 tsp cayenne pepper

-2 jalapenos, sliced extremely thin on the bias

-about 12 chives, sliced very fine

De-case the chorizo and cook until done. Remove the chorizo from the pot, reserving the fat, and add the mirepoix and bell peppers and cook in the chorizo fat. Sweat until tender and season with salt, pepper, smoked paprika, and cayenne. Add the Guinness and bring to a simmer. Reduce the Guinness by half. Add the stock and cream and bring to a boil. Simmer the mixture for about 10-15 minutes. Add the cheese one small handful at a time while stirring constantly. Do so until all the cheese is completely melted. Use an immersion blender, blender, or food processor and blitz the soup. Add the chorizo. Garnish with chives and jalapenos.

(Can’t find the damn camera again…)

Tagged , , , , , , , , , , , , , , , , , ,

Day 1, Ingredient No. 2-Molasses

IMG_0454

     Today I woke up with an abundance of energy and excitement. It was my first day in months that I would have a real day off, a day off from the restaurant as well as a day with no school work to be done. Of course, it was also the start of the culinary lottery. So after waking up later than I had been able to in weeks, having sex with my girlfriend (of which it also felt like it had been weeks), it was time to get cooking.

I turned my attention to my crafted “lottery machine.” By lottery machine, I of course mean a cardboard box filled with 144 ping-pong balls I had numbered with a Sharpie. I cut a hole not much bigger than a ping-pong ball (and soon found out it needed to be bigger) and taped a printed list of the 144 ingredients. So as my girlfriend looked on, I gave the box a shake (and damn ping-pong balls are so noisy) and tipped the box over to reveal the first ingredient of my quest.

The ball hit my hand, the starting point of 144 meals, the start of what I hoped to be a wonderful culinary experiment, brimmed with delicious meals, culinary creativity, and wonderful times and memories with those I would share the meals with. And it all started with this first number, the number 2. My eyes quickly shifted over to my reference list where they found the number 2.

2. Molasses

Molasses? Shit. Of all the savory herbs, meats, seafood, vegetables, and condiments I had to start with something sweet? And not just a sweet food such as an apple or banana, but molasses which is essentially a sweetener.  Well, I had purposely put some items on the list which I knew would be somewhat difficult to make the star ingredient of a dish. I did this with purpose, I did it for the challenge, but to start with an ingredient like molasses would not be the easiest ingredient for sure.

Oh sure, If I were a baker drawing molasses would be no problem. Gingerbread, Boston Brown Bread, spiced cookies, Anadama bread, pumpkin pie, all just a small number of the amount of baked goods that incorporate molasses. But the simple fact is, I’m not a baker.

And this is not to say I don’t like molasses. In fact, it is an ingredient I love. Add some sweetness as well as deep, rich, slightly smoky, almost malt-like flavor? Yes, I do love molasses. But I surmised making it the star of a dish might prove to be a bit of a challenge.

Yet, one aspect I hope will last in this experiment came in to play. Because my mind was only focused on creating a dish with one particular ingredient, and every other ingredient being an afterthought, the ideas starting flashing quickly in my mind. What about a BBQ sauce? A glaze? Baked beans? Braising liquid? Ah, yes. Not letting the mind wander to a vast amount of ingredients allows it to be more decisive.

I liked the idea of either a glaze or a braising liquid. The question is, what protein would I use said glaze or braising liquid with? I had a few ideas, so I decided to just go to local meat market and see where that led my thoughts.

I immediately shuffled over to the pork section, Pork and molasses being wonderful together. But then again, what about a nice demi-glace with molasses on a seared steak? Hmm. As I stood there scanning my eyes caught what was once easily my favorite protein, but now was one I ate so rarely I couldn’t remember the last time I had eaten them. Yet, as soon my eyes caught them, I knew; Baby back ribs.

For a large portion of my years, particularly my early and mid teenage years, I believed I would never grow tired of baby back ribs. Tender, smoky, fatty, ever so slightly chewy, and as all things pork go, absolutely delicious. But then I secured my first job in a restaurant (like most cooks I started at the age of 16 as a dishwasher) and my first job as a cook, both in BBQ restaurants.

Now, BBQ may be something that is held sacred by people, and one of the simplest food pleasures there is. Take a usually tough piece of meat, season it will a bevy of spices, and smoke it for a long period of time until it is deliciously smoky and tender. It doesn’t get much simpler or more delicious than that. However, 2 years in BBQ restaurants rendered BBQ almost utterly inedible for me.

The reason is simple; BBQ’s most appealing factor is the smokiness of the meats. In order to impart this flavor, one must utilize smoke (just in case you were wondering). But one aspect of smoke that is not so pleasant is being surrounded by it…constantly. So at my tenure at the second restaurant I worked for, I began to despise that hickory smoke that just a few years prior would have caused my saliva glands to go into hyperactive mode, sometimes so much that a deep breath could drown me. But after working open to close 6 days a week for months on end, this smoke not only became an un-savory scent, but also a scent I couldn’t escape. It seeped into every fiber of clothing I wore to the restaurant, even my socks. And no amount of washing could negate the smoky scent. You could pull a load of clothes from the washer, put them into the dryer, immediately take them out and they would smell more like smoke than detergent. I despised it. Because of this, only until about a year or two ago (approximately 5 years removed from the BBQ restaurants) I still could not bring myself to eat BBQ of any sort.

However, I can happily say I know have rekindled my passion for all things smoked. But, seeing as how I don’t have a smoker, and want to be able to directly control a low temperature (which would be extremely difficult with a typical charcoal grill) I decided that I would forego the smoke and braise the ribs. This of course would also enable me to better utilize the molasses.

One aspect of cooking pork ribs that so few people are able to get right is not the cooking time, the cooking process, or even the flavorings. In fact, what they usually get wrong for tender ribs that pull easily from the bone is perhaps the most simplistic step in cooking pork ribs-removing the silver-skin, the tough membrane that covers the concave portion of the ribs. Some people may be proponents  of leaving the silver-skin on, but if my cooking of thousands of racks of ribs has served me justice, I have found that removal of the silver-skin is imperative. Generally speaking, if you do not remove the silver-skin, your left with a basically inedible rubbery layer that feels as if you’re trying to chew  through ribs that have had latex gloves melted onto them. That just doesn’t sound appealing to me.

Many people (including a friend of mine) do not remove the silver-skin because, in their words, “It’s fucking impossible!” Well, some baby backs and St. Louis ribs tend to hold on to their silver-skin as if they were a 16 year old newly deflowered girl hanging on to their first lay, but the silver-skin on most racks can be removed so long as you use the right technique. I generally have no problems using this technique-

  1. Slide the blade of a pairing knife under the second to last bone of the smaller (more curved) side of the ribs, allowing the knife to follow the curve of the bone. Once you have reached about ¾ to 1 inch under the silver-skin, turn the tip of the knife into the bone, allowing the silver-skin to be raised from the bone.
  2. Remove the knife and repeat step one on the last bone on the same side of the ribs.
  3. Work your fingers under the silver-skin that you just raised with the knife. Work your fingers to the far end of the other side of the bone.
  4. Turn your hand, still grabbing the silver-skin, parallel and over the top of the ribs. The silver-skin will generally be removed in one swipe. If not, it will usually go about halfway to ¾ of the way. Repeat the process where the silver-skin still remains.

I had decided to dry rub these ribs before braising, and brown sugar is, of course, a vital ingredient to a dry rub. Although I usually keep brown sugar on hand, it’s not really necessary as long as you have molasses and granulated sugar. In order to make brown sugar (and the proportions aren’t exact and frankly don’t need to be), combine approximately 2/3 of a cup of granulated sugar with 2 tbsp of molasses and blitz in a food processor and you have brown sugar.

     IMG_0453

     I busted out my spice tub and homemade brown sugar and made a dry rub. I let the ribs sit in the fridge for 1 ½ hours after seasoning to lets the spices start to go to work. Adding the aromatics, beer (of which I surprisingly didn’t drink most of before adding), and molasses made for an already pretty tasty smelling dish. 3 hours later, I would see how they turned out.

Day one, dish one. The verdict? These ribs were wonderful. They were tender, juicy, sweet, sticky, and packed with flavor. But now the true verdict-did this concoction highlight the molasses? The truth is, not really. But there was an undeniable sweetness, both naturally from the ribs as well as the molasses directly on the ribs, as well as the tangy, sweet sauce made from the braising liquid. So the molasses may not have been the conductor, but it was certainly a first chair. Overall, I’m very happy with how this dish turned out, not to mention very full.

1 dish down, 143 to go.

IMG_0456

Guinness and Molasses Braised Baby Back Ribs

-2 racks of baby back ribs

-2 14.9 oz cans of Guinness Draught

-3 tbs molasses

-1 yellow onion, half-mooned

-4 ribs of celery with leaves, rough chopped

-4 cloves garlic, crushed

-1 pt. beef stock

-Spice mixture as follows-

-2/3 cup granulated sugar

-1 ½ tbsp molasses

-1 ½ tbsp smoked paprika

-1 ½ tbsp kosher salt

-1 tbsp granulate garlic

-1 tbsp ground mustard

-1 tbsp black pepper

-1 tsp dried thyme

-1 tsp cayenne pepper

-1/2 tsp oregano

-1/4 tsp ground cumin

-pinch red pepper flakes

Remove the silver-skin of the ribs and cut into half racks. Rub the spice mixture onto the ribs and let sit in the refrigerator for 1 ½ hours. With the ribs meat side up, pour the molasses, Guinness, and stock on top of the ribs. Remove the ribs from the pan and add the celery, onions, and garlic on the bottom of the pan. Place the ribs meat side down on top of the vegetable mix. Cover pan with foil. Place in a 300 degree oven and cook until tender (about 2 ½ hours). Remove the ribs from the oven and strain approximately 2 cups of the braising liquid into a saucier. Reduce by ½ and add 1 ½ tbsp of butter, season with salt and pepper and serve over the ribs.

Tagged , , , , , , , , , , , , , , , , , ,